OAuth 2.0 Tokens
BidZenith uses App Clients to support authentication with OAuth 2.0. App clients enable you to generate JWT tokens which are used by BidZenith to authenticate API requests. If you're not familiar with OAuth, think of it as a more secure way to send API calls, similar to an API key or username/password combination but with enhanced features. The client credentials flow is the OAuth flow that BidZenith supports.
You provide the OAuth 2.0 authentication provider with a
client_id and a client_secret. You can think of these as similar to a
username and password, respectively.
A successful authentication returns a JSON web token (JWT), which can then be passed into subsequent requests as an authenticated application.
TLDR, I'm ready to go!
If you're already familiar with JWT tokens, and you're ready to dive into our APIs, head on over to the API Reference.
The API Reference offers a hands-on experience to understand and demonstrate the capabilities of the platform.
Always keep client ids, client secrets, and JWT tokens private. Do not share them through email, Slack, Discord, forums, or other public channels because doing so can lead to unauthorized access. Treat these tokens with the same confidentiality as your personal credentials.
Advantages of OAuth 2.0
OAuth 2.0 takes more work to set up but offer several advantages:
-
OAuth 2.0 has built-in revocation flows in case a key is compromised.
-
OAuth 2.0 doesn't suffer from information leakage such as the username that created the client.
-
JWT tokens automatically expire after a short period of time, so if a JWT token ever does accidentally get posted to a public place, it's less likely to be valid by the time an attacker discovers it.
-
JWT tokens are detected by many security scanning tools, allowing them to more easily be flagged in the case of accidental publication.
Authenticate with OAuth 2.0
OAuth 2.0 authentication consists of three steps:
- Create an application client
- Generate a JWT Token
- Use the JWT token in an API request
Create an App Client
Navigate to https://app.bidzenith.com/appclients to create a new application client.
- Click Create app client.
- Enter a Name and Description for the app client.
- Select the appropriate roles for the client. You can choose from any of the roles available to you.
- Click Create app client.
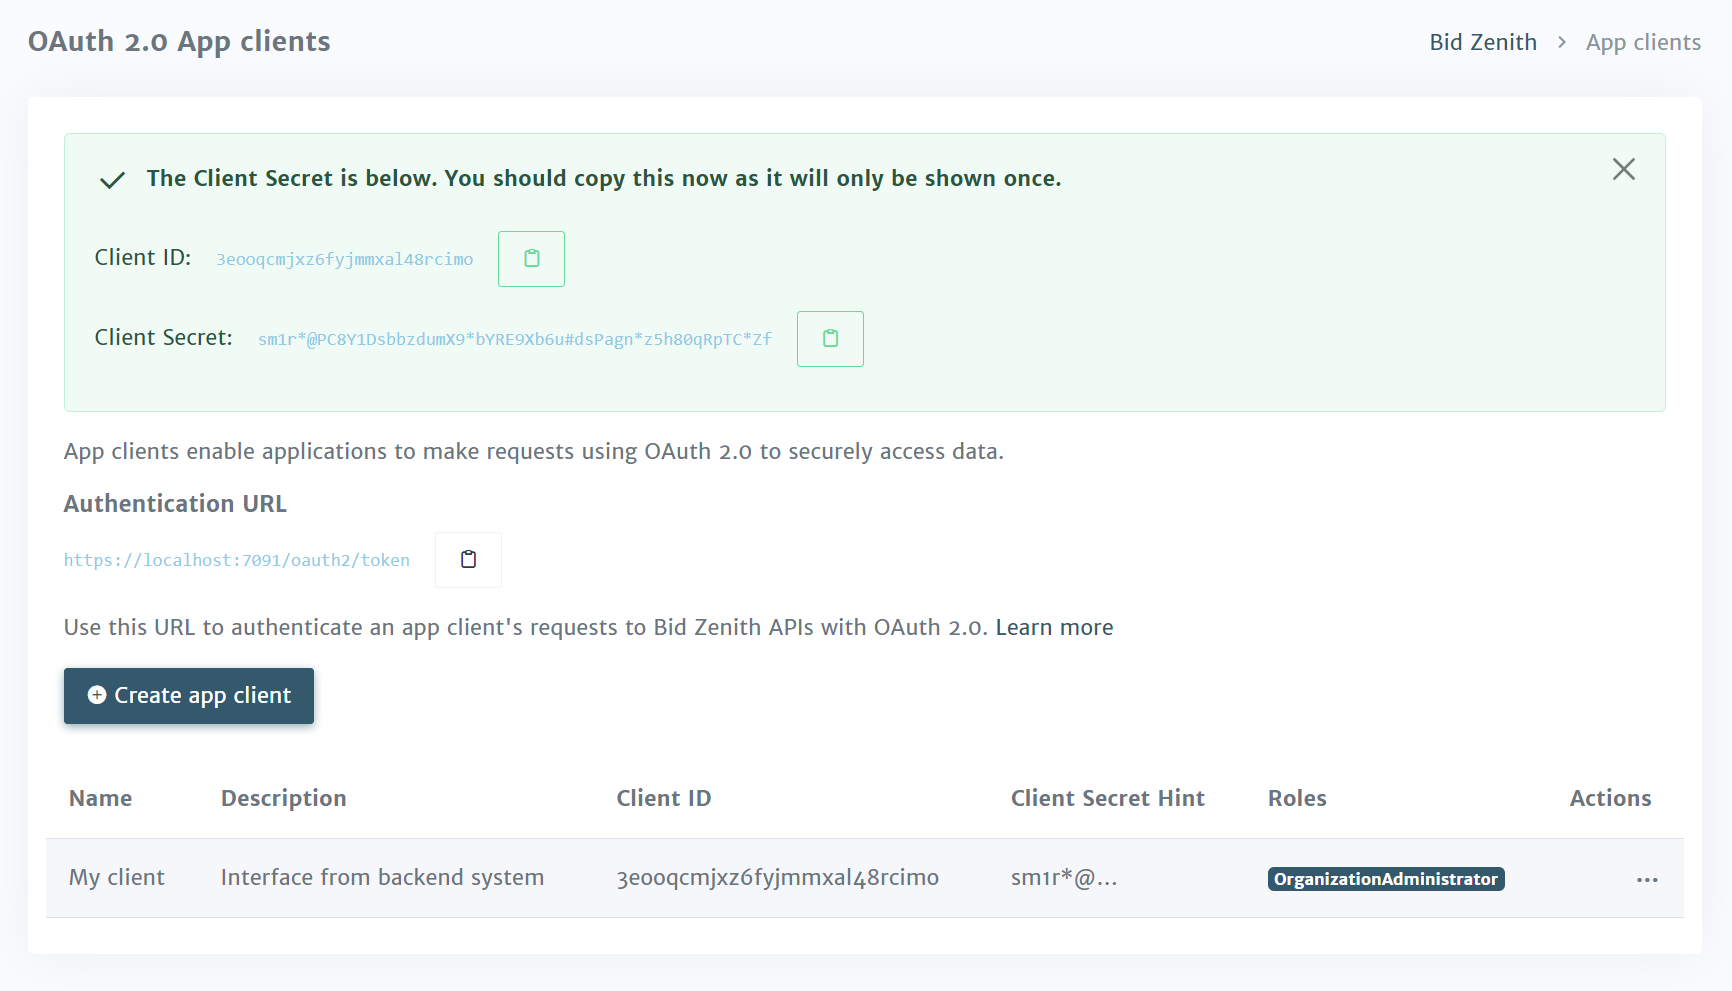
Upon successful creation, you'll be presented with the following information

Authentication URL
Access your authentication by clicking the copy icon next to the Authentication URL.
The URL has the following format:
https://app.bidzentih.com/oauth2/token
Client ID
Access the client_id by clicking the copy icon next to the app client's ID.
Client secret
Access the client_secret by clicking the copy icon next to the app client's secret
The client secret is only provided once, so be sure to copy it when it is presented. If you forget the client secret for an app client, delete the app client and create a new one.
Now that you have values for the authentication URL, client_id, and client_secret,
you can generate a JWT token using the client credentials flow.
Generate a JWT Token
Use the information from the previous step to send a request to generate a JWT
token. The client credentials flow is the OAuth flow that BidZenith supports at
this time. When you create your client credentials grant request, you need
the Authentication URL, client_id, and client_secret values to
generate the token correctly.
Here's how you can generate a JWT token in cURL and JavaScript:
- cURL
- JavaScript
curl -XPOST -H 'Content-type: application/x-www-form-urlencoded' \
  -d 'grant_type=client_credentials' \
  -d 'client_id=<your client ID goes here>' \
  -d 'client_secret=<your client secret goes here>' \
  https://app.bidzenith.com/oauth2/token
const params = new URLSearchParams();
params.append("grant_type", "client_credentials");
params.append("client_id", "<your client ID goes here>");
params.append("client_secret", "<your client secret goes here>");

const response = await fetch("https://app.bidzenith.com/oauth2/token", {
    method: "POST",
    headers: {
        "Content-Type": "application/x-www-form-urlencoded",
    },
    body: params,
});

const data = await response.json();
const jwt = data.access_token;
The response will have a structure like
{
  "access_token":"<issued access token>",
  "expires_in":3599,
  "scope":"",
  "token_type":"Bearer"
}
Use the JWT token in an API request
To use a JWT token in an API request, pass the token using the Authorization
header configuration.
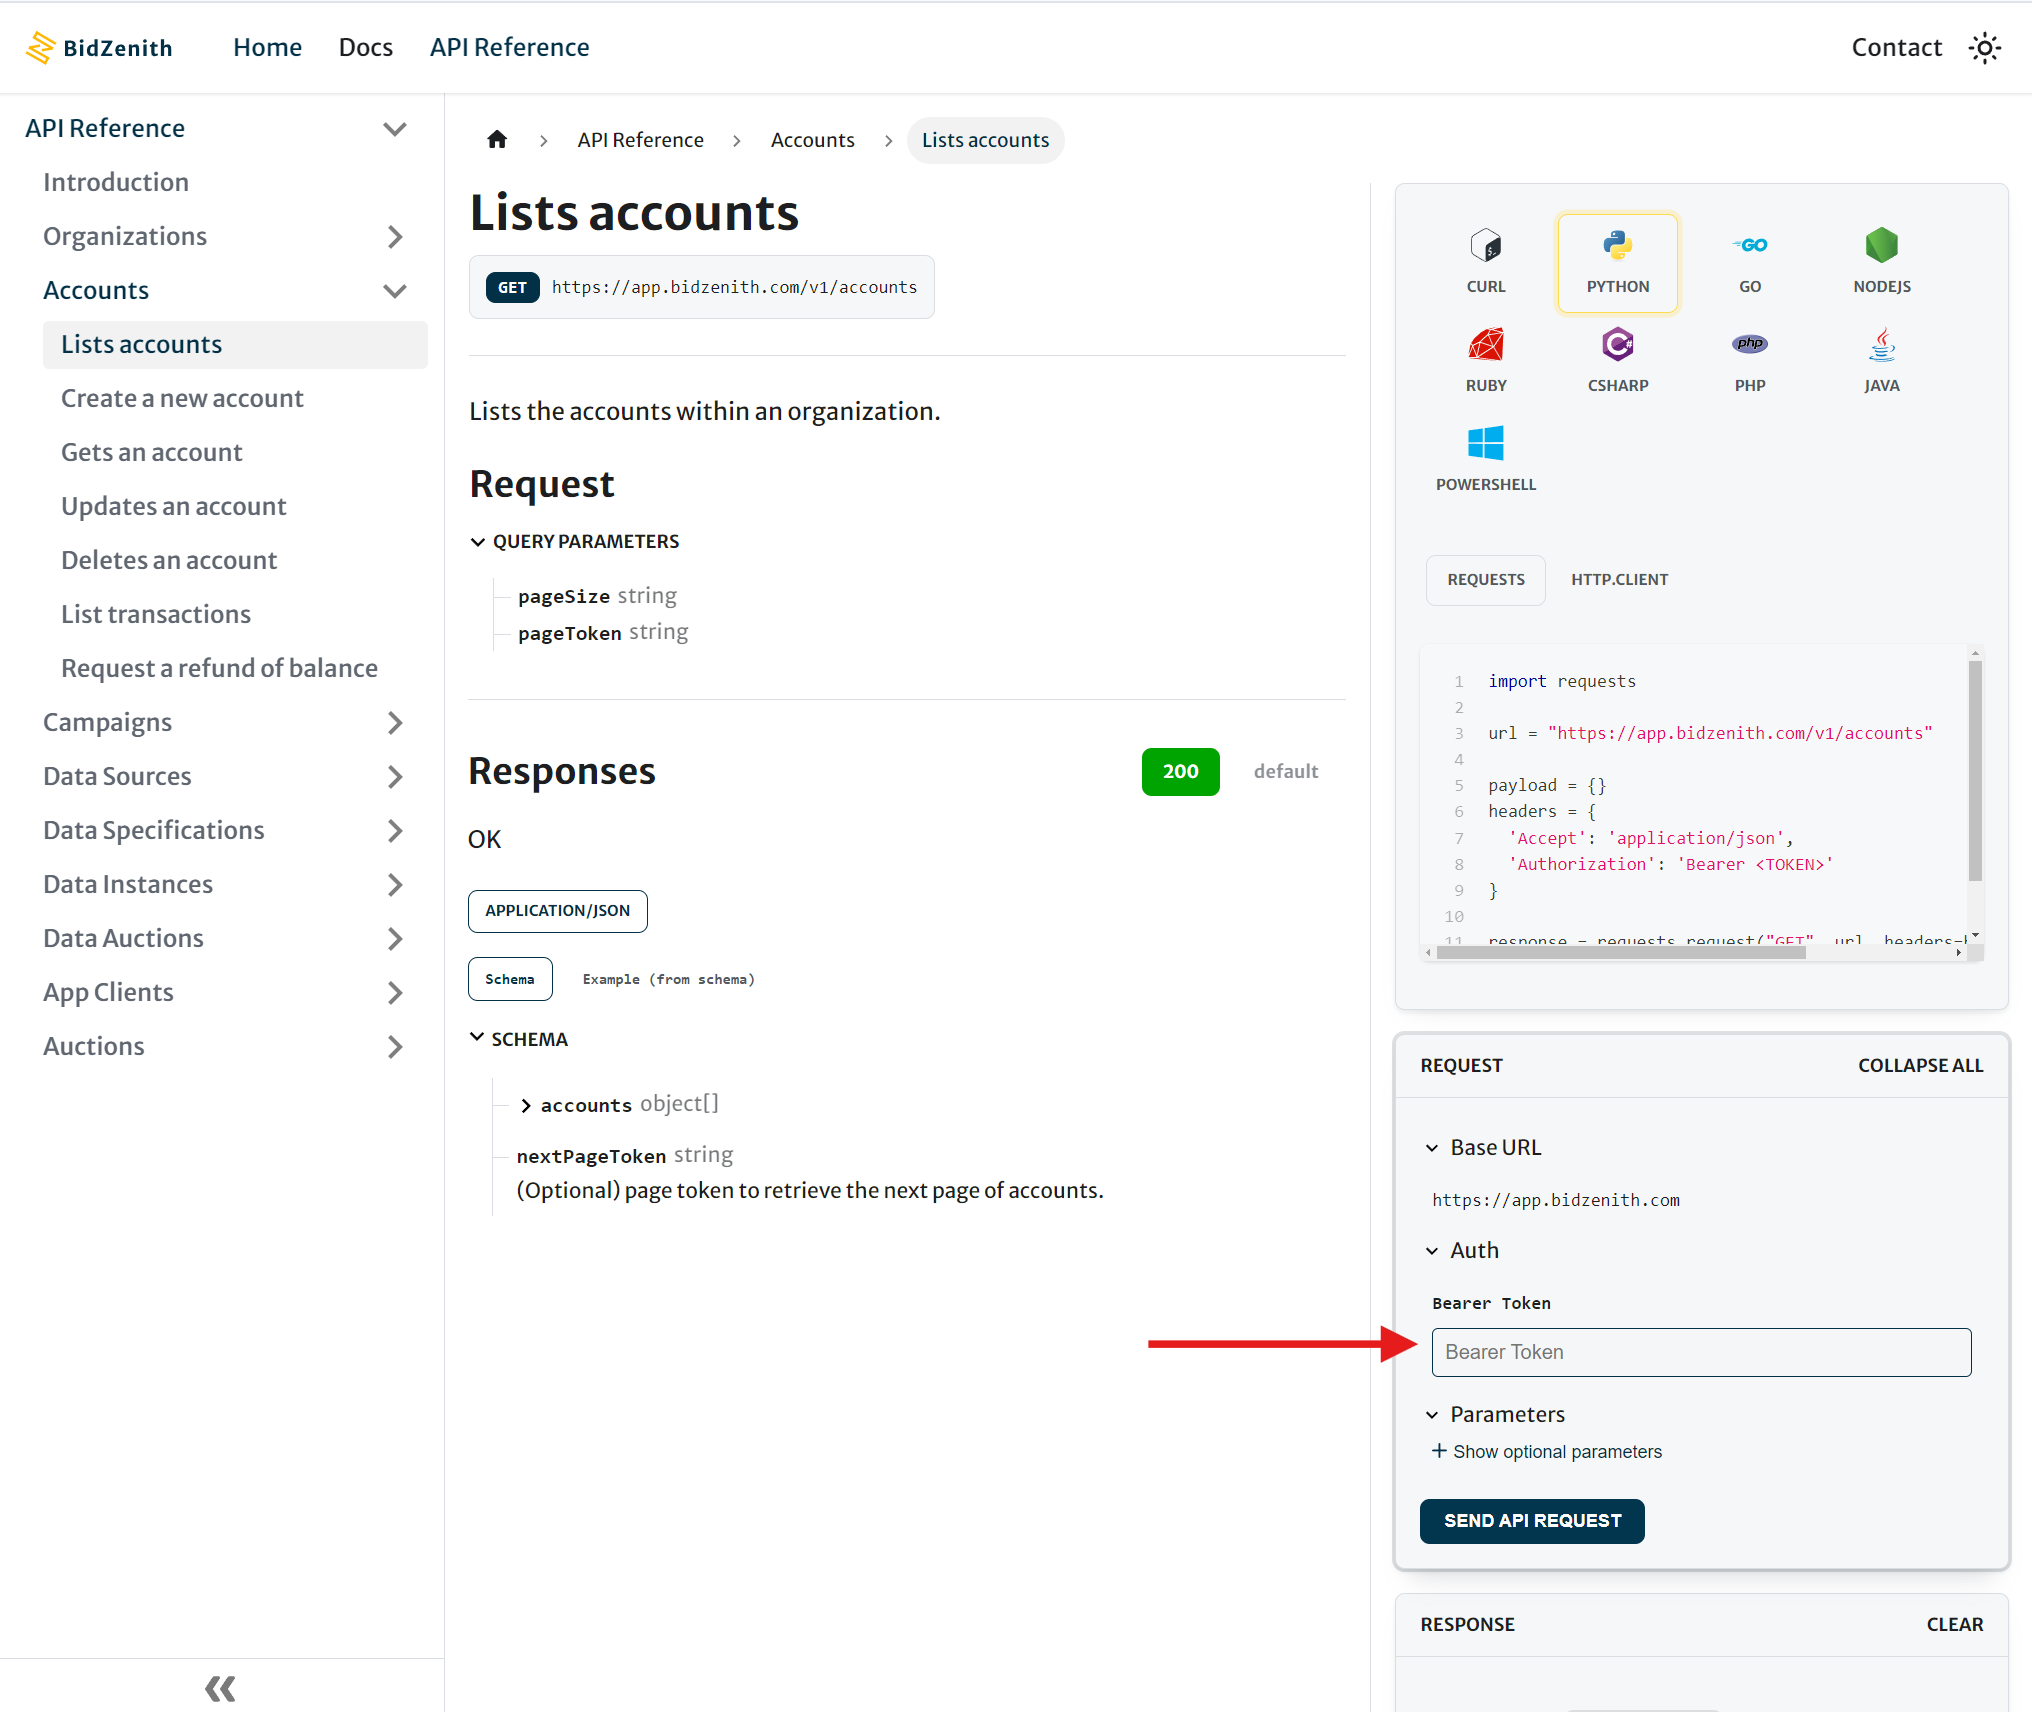
If you're using the API Reference documentation such as List Accounts API, use the JWT token value in the Bearer Token field:
